List off items needed for first scene.
5 - A2 Foam Boards - To use as walls, support and to build props from.
Box of small pins - So the character can remain upright but also to stick pieces of furniture together.
4 LED lights - To light the scene from above.
4 Blue LED Lights - As mentioned in the previous post coloured lighting is a must for our set.
4 Shelves made from A2 foam board.
Table and Chair made from foam boards.
Mechanical Door made from foam board also.
Kebab Stick - To operate the door from the other side without being in shot.
Laminate - Clear piece for our observation window.
1 Large light with stand - This light will be needed so that the light source is constant and no matter what time of day we shoot, the lighting should not change in the animation. Not sure if this will work but we will see.
Camera and a Macbook Pro to shoot the scene.

We decided on Tables as they are normally found in labs, the color scheme is plain white, for the best results i looked for some reference. The table above is perfect for our theme, with the added bonus of it being extremly easy to construct. In addition we will add several shelves into the scene, sticking to the plain white laborotory theme.

Bracketless white shelves that are placed in a uniform manner will add to the scene and further enhance this creepy organised atmosphere that is created by the color scheme and character.
We have also decided to add a observation room, the wall will include a mirror that will reflect the contents of the set. The reason behind this is to further back up the idea of everything constantly being watched.

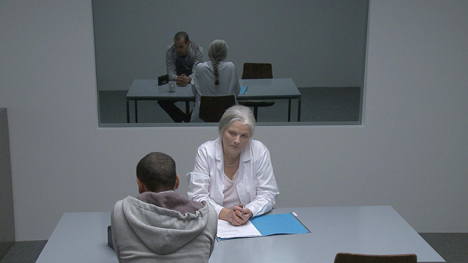
After browsing the net for suitable reference images we had narrowed it down to two images, the first picture is the one we have chosen simply due to it being easiest to add into the scene. The second image was in our opinion the better idea, but as we had to purchase Reflective window film which would be a problem as it would take time to arrive and would put us behind track as we plan to begin filming by Wednesday the latest.
 To record the scene a constant light source is needed, so as a group we decided to duplicate the spotlights in the classroom. The light source will consist of three LED lights which will act as spotlights for the scene. Not only do the lights add to our theme, it is a light source which will not change.
 The image above is almost identical to the type of lighting we had in mind, it is a added bonus now that we have a reference to work from. The group has begun creating the lighting rig which will consisit of white and black foam board with added holes for the LED lights to slot through.
 We have decided to add Hazzard tape to the set not only just to cover up cracks, cthe cracks being where the boards connect, however it also adds to the decoration of the set. It suits this experimental environment well as hazzard tape is commonly seen in films where disasters have happened or experiments are being conducted.
  After briefly running through our first potential scene, we have begun building our set. We as a group have began brain storming on furniture best suited for our environment. It is important that our props suit the visual style we are trying to portray. We have ideas in mind that were helped along with research into other IP's that had similar themes both visually and narratively.
 The shelves were created with the reference image in mind, when designing our set we are cautious when considering designs due to time restricitons and availability of resources needed. We are happy with the result as we feel the shelves suit the scene well and were constructed easily and exactly how we wanted them. Clean and uniformed, the shelves are also the right scale against the set and character. A possible movement for Camera Man will be to walk over to the shelves and maybe pick something up and walk away to his desk where he could examine the object.
 Owen had this briliant idea of creating some sort of holding pod for the character, Amo had drummed up some brilliant concepts, but as usual we were restricted when it came to materials being available but also the time needed to create something so complex. However Owen being the quick thinker he is came up with this simple yet very clean and cool looking pod. I immediatley jumped on the bandwagon and was excited about this design due to how we could use it and sync it with sound effects, Each door could pop followed by a slow mechanical swoosh.
 Here is the underside of the LED spotlights that will be stuck to the celing of the room. The Circuit will consist of four white LED lights powered by two 9V batteries. These lights should add sufficient lighting to the scene but also add to the aesthetics of the set. We will have other means of lighting. I recently watched Terminator 2 Judgment Day for the upteenth time and was actually surprised i overlooked this film for reference. There are several scenes in the movie where special robotic pieces are behing held in a clean clinical lab environment., in addition to a Mental institution that held the protagonists mother. The type of room she was being held in should be brilliant for our set, as it also was under heavy surveillance. It gave me a few ideas on what other props we could add to the set, but above the most important aspect i picked up from both scenes was the special type of coloured lighting that really sets the mood and atmosphere for the environment.


A special type of door is found in testing areas, and Laboratories. The type of door we have added to the set is a wide sliding door. I am pleased with this design as it has a lot of possibilities to add some cool stuff when it comes to the post production stage of the design process. The door has a hinge attatched to the top rim and bottom rim of the door, so as it slide it doesn't fall out of place and most importantly looks smooth when opening.
 Lastly our addition of coloured lighting completes the set. When watching Terminater 2 i saw how effective the lights could be when trying to create a certain them and type of atmosphere. Luckily for our group Owen had a set of four very slick looking blue lights. As there were four we had extra props to not just fill the space but also create a small but effective lit scene. The LED lights for now have been taken down for several reasons.
No comments:
Post a Comment